Okay, this is the 2072 I was working on last winter and I'm trying to find time to work on it but I never have time anymore.
I pulled the rear, did the drain holes and added rear braces. I bolted everything back up and all is good.
I pulled the motor to replace the front & rear oil seals, cleaned everything up, glued one magnet back on the flywheel and replaced the bearings in the front PTO.
I then replaced the fan, all of the ball bushings and rag joints on the driveshaft. Then I placed the shaft in the tractor and bolted the rear coupler to the input shaft.
I reused the drive shaft, the flange assembly that bolts to the motor, both shaft couplers on the shaft and the splined coupler for the pump.
Next I got the engine back in the frame and slid it back to the driveshaft
Here's where the trouble starts....
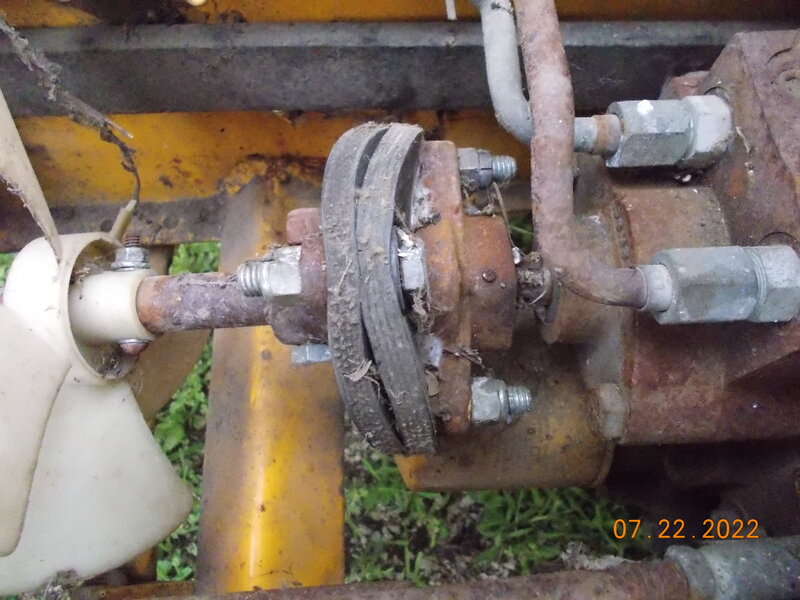
The motor plate will not bolt to the frame because the holes won't align up. The black circle is the hole in the frame for the bolt.

I shoved everything back as far as it will go but it won't go anymore.
I ran into this issue when I did my 882 and I had to make a new driveshaft. That is a problem for me because it will require a lathe for a SGT driveshaft since the shaft is 3/4" but turned down to 5/8 on the ends for the ball bushings.
I tossed the old rags in the trash months ago so I'm not sure how thick they were. I purchased these rag joints years ago from my Local Cub Cadet dealer so they are OEM. Here are the new rags and the measure 0.75" when bolted in. I'm pretty sure the new rags are thicker than the original and this is my issue.

How important is this pin in the rear splined coupler? If I remove it and shove the coupler back 1/4" everything lines up and the motor plate can bolt up. I don't see a reason for the pin but I'm pretty sure Cub didn't put it there for nothing.

Being that the rags are thicker, I'm thinking that the 5/8 part of my driveshaft is not going into the ball bushings as far as they should. Thoughts?
I pulled the rear, did the drain holes and added rear braces. I bolted everything back up and all is good.
I pulled the motor to replace the front & rear oil seals, cleaned everything up, glued one magnet back on the flywheel and replaced the bearings in the front PTO.
I then replaced the fan, all of the ball bushings and rag joints on the driveshaft. Then I placed the shaft in the tractor and bolted the rear coupler to the input shaft.
I reused the drive shaft, the flange assembly that bolts to the motor, both shaft couplers on the shaft and the splined coupler for the pump.
Next I got the engine back in the frame and slid it back to the driveshaft
Here's where the trouble starts....
The motor plate will not bolt to the frame because the holes won't align up. The black circle is the hole in the frame for the bolt.

I shoved everything back as far as it will go but it won't go anymore.
I ran into this issue when I did my 882 and I had to make a new driveshaft. That is a problem for me because it will require a lathe for a SGT driveshaft since the shaft is 3/4" but turned down to 5/8 on the ends for the ball bushings.
I tossed the old rags in the trash months ago so I'm not sure how thick they were. I purchased these rag joints years ago from my Local Cub Cadet dealer so they are OEM. Here are the new rags and the measure 0.75" when bolted in. I'm pretty sure the new rags are thicker than the original and this is my issue.

How important is this pin in the rear splined coupler? If I remove it and shove the coupler back 1/4" everything lines up and the motor plate can bolt up. I don't see a reason for the pin but I'm pretty sure Cub didn't put it there for nothing.

Being that the rags are thicker, I'm thinking that the 5/8 part of my driveshaft is not going into the ball bushings as far as they should. Thoughts?
Last edited: